Since last March we have been working primarily remotely. In the past, data transfer was done a lot of ways; this last 16 months have been trickier as we aren’t all in the same places. We’ve switched many users to laptops, and worked to transfer user data from an online data backup service.
This workflow is great for a distributed team, we can set up a new system, restore a backup and send it off to them with only a few notes on how to log in and sync up your password. This has worked well, but sometimes we’ve seen issues where user folders that have been copied in and had a new user created utilizing the existing user folder have been unable to make any TCC approvals for camera, microphone or file access. This is obviously a big problem in the world of daily zoom meetings.
My workflow after a data transfer has historically been to copy the data from another system manually, or more recently restore from an online backup. I then ensure the user folder is owned by the correct user with a simple one liner in terminal (or automated in a script):
sudo chown -R username /Users/username
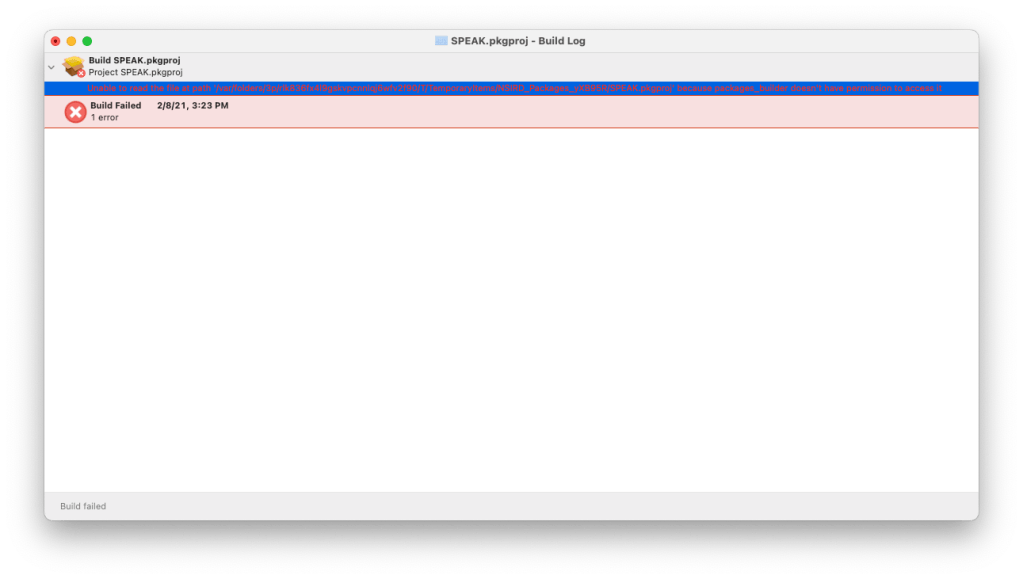
In the past this has worked quite well, but with permissions and security changes with macOS Catalina we’ve been seeing more issues where even when the ~/Library/ folder is not copied over, the TCC database file seems to not allow any changes. Applications like Zoom, Microsoft Teams, WebEx and others are not prompting for camera and mic access at all, and the system preferences pane appears completely blank.
There is a command to reset the TCC permissions:
tccutil reset All
Somehow, even in this case does not seem to work. It appears the folder that houses the TCC permission information ~/Library/Application\ Support\com.apple.TCC/ has incorrect permissions, not even allowing the user to reset it. I expect this has something to do with the permissions that result in a cascade of not allowed messages when you run the aforementioned chown command.
After some searching I’ve found that the best solution is to delete the ~/Library/Application\ Support\com.apple.TCC/ folder. After this is deleted when you open up an application requesting permissions the dialog pops up normally.
Yesterday I presented at the Penn State MacAdmins Campfire Sessions about testing as a Mac Admin. While the video isn’t available yet I’ve written some notes here to accompany my presentation.
Everyone Has a Testing Environment
Some people are lucky enough to have a separate production environment too. There are a lot of things to talk about, but first let me make a few points about testing:
Don’t test on your daily driver machine. Its tempting, but consider one of the options I’ll detail below to test on a device that doesn’t contain your regular day to day data and configuration.
Use AppleSeed to test Beta versions of major and minor updates. Testing these things in advance gives you an advantage when looking to deploy at large scale, you will see issues you can resolve earlier
Create a “Testing Group.” These users can be easy to find, they’re likely emailing you or putting in help desk tickets to update sooner. Utilize those people with an agreement that they test in advance of wide rollout and plan to collect feedback. Real users will often find issues you haven’t and as a result make great testers.
Plan for testing. If you don’t making time in advance to plan, you’ll be putting out fires when they come up instead of being able to work on them in advance
Testing Management Tools
New open source tools. Maybe you haven’t tried a tool yet but heard great things. You might want to use Nudge to gently suggest users upgrade to the latest macOS. Maybe you’re just dipping your toes into Mac management and want to test out Munki for software management.
New features in existing tools. Maybe the latest build of your Mobile Device Management, or MDM, tool includes some new features you want to roll out or test. Apple updates the MDM spec with some frequency, and those might take a bit to be implemented into the MDM you are using.
New tools from existing vendors. Jamf has a couple features to add on you might not be using if you’re a customer (or even if you’re not) like Jamf Connect or Jamf Protect.
Many paid commercial tools offer some sort of free trial. Many MDMs offer limited support for a small number of devices, feature limited version, or a limited time trial. These are all great options to work on learning new things. Some tools, like Okta for instance, have developer programs so you can learn about the tool even if you’re not yet using it.
Open source products often have a rich community with many blog posts or support from other admins on the macadmins slack. Many are well documented on their wiki pages on GitHub, like the Demonstration Setup for Munki that walks you through setting up a test instance.
A great tool for a beginner with multiple open source tools baked in is Two Canoe’s MDS. Initially a tool to use a USB drive to quickly wipe and reinstall an OS with your configurations and packages, it has become a very powerful tool that now includes MicoMDM, Munki, MunkiReport and tools to download multiple versions of macOS installers. This is a great tool to learn with as it can handle just about anything to manage macOS devices.
Testing macOS
You may want to test macOS for many reasons. New major or minor releases from Apple can change features you were using or add new ones you may need to. There may be software you are deploying and need to check compatibility. You may need to test deploying and installing updates.
You can test devices in many ways:
Virtual Machines. Virtual machines have some advantages for testing. There are virtualization programs that can be as cheap as free. You can roll back to snapshots to start over again with testing making repeated testing an automated workflow very quick. One drawback is that a virtual machine does not fully replicate the experience on real hardware
Local Virtual Machines. Using a virtual machine installed with a program like VMware Fusion, which now has a free version for personal use. There are alternatives such as Parallels and VirtualBox as well. These are considered a Type 2 hypervisor, which means it runs on top of another operating system and a guest shares resources with the host system. There are some downsides as you may need more RAM or storage to run local VMs, and currently macOS guests are not supported on Apple Silicon devices. You may suffer reduced performance on your primary machine while running a VM. Here’s a great guide from HCS on setting up a virtual machine with Fusion Pro 12 and adding a serial number to test automated device enrollment.
Baremetal Hypervisor. You can also install a bare metal hypervisor, considered a type 1 hypervisor. This means there is no underlying operating system for the guest OS. They can be very quick and also can be free with VMware ESXi. This requires dedicated Apple hardware but will run on most Mac minis. There are caveats with newer systems so a 2012 or 2014 Mac mini may be the best low cost option (especially if you have an old one lying around).
Physical Test Devices.
startosinstall --eraseinstall. Added in macOS El Capitan this allows automation of macOS installation. in High Sierra we got some cool new features like the erase install option. This allows you to quickly erase and reprovision systems for reuse.
APFS Snapshots. You can take a physical device and create an APFS snapshot (on High Sierra or newer as it does require APFS support). Here is the original Mod Titan blog post detailing how to use it. Its a great way to quickly test, but there are some limitations when it comes to SecureToken or Volume Owner on T2 and M1 equipped devices. Nevertheless it is a good tool to use if you’re aware of the limitations.
Secondary Install on a Different Volume. Apple provides an article on how to create a new volume on an APFS device to install a test OS. This can be applied to your existing system to install a second version of macOS to use for testing without disrupting your primary machine
DFU Restore (Apple Silicon devices only). Device Firmware Update is a tool some may be familiar with from iOS devices. It puts the device into a stat where you can quickly load the firmware on or erase and update quickly. It is a little tricky with laptops but Mr. Macintosh has a great blog post with all different models and how to get into DFU and restore. it is very quick once you’ve downloaded the file, and you can download different versions of macOS Big Sur if you need to test updates. Again Mr. Macintosh has a great resource with the download links for Big Sur restore files.
Testing Packages and Scripts
Packages are a great way to build installers you can use with nearly any Mac management tool to install software. You may need to build a package for software you’re installing because you need to add a serial number, customize the installation, or its provided in a non-standard way and may need to kick off with a script. There are many tools you can use to build packages, both command line and with graphic interface.
Whitebox Packages. This is my preferred app for a GUI to build custom packages. It has tabs for the different components of an installer package, including payload to drop files, scripts (and resources to use with scripts). It also defaults to correct permissions and script names which is helpful for those of us who are not always as detail oriented as we should be.
Jamf Composer. This product can be purchased standalone and does not require you to be a Jamf Pro customer. It does the same things as the other tools to build a package but includes an interesting tool to do a snapshot to see what files might be changed during an install. This is really useful with non-standard installs, but you may need to tread lightly. It tracks all changes and some may be unneeded for theinstallation.
munkipkg. Munkipkg is a free command line tool to build packages. You create a folder structure and a file with build information which turns it into a package.
pkgbuild. This is the built in command line tool to make packages, and all other tools are abstractions to use this.
autopkg/Autopkgr. Autopkg is a great tool to automate downloading and building packages. Autopkgr gives you a GUI to start with if you’re not really sure where to start. Recipes are the bases, and you can pick and choose existing ones, build your own, or override with options. Its a powerful tool and great for automation. If you get comfortable with these and want to test your own, you can build your own server to host these tools. They can integrate easily with Munki or with additional plug ins they can be used to automatically upload to Jamf Pro.
While not strictly the same, a very useful related tool is Suspicious Package while allows you to see whatan installer package is doing. Its great to learn by seeing what something else does.
Scripting on Mac comes in many flavors but some of the most common ones you’ll see are the following:
Python. Apple still ships Big Sur with Python 2.7 even though it was deprecated officially in January 2020 (Though originally it had been scheduled to sunset in 2015). Python3 is not included in macOS by default but you can install it with Xcode tools. If you are writing python3 scripts I suggest you consider deploying it with a package like macadmins python or relocatable python so as to not disrupt any other installs; and you can be certain what version you are working with.
Bash. The previous default shell in macOS to zsh, and a very commonly used scripting language.
Zsh. This is default shell on macOS as of 10.15 Catalina. While very similar in many ways to bash there are differences. Consider reading Moving to zsh by Armin Briegel for a great in depth explanation.
Its very important to remember things like file permissions and ownership when using scripts, and again to ensure you are using a dedicated test system (whether real or virtual).
Testing Profiles
Profiles are the current Apple approved way to deliver settings to managed devices. They can be created in a few ways, but with most MDMs a good practice is to sign and upload them for distribution with the MDM. You can optionally install with a click and approval. Prior to macOS Big Sur they could be installed via the profiles command. Just before my session I saw a fantastic post from Bob Gendler detailing how to find the preferences you want to set with a profile. Two tools I find very useful for creating them are:
Profile Creator. Easily create and sign profiles before uploading them to your MDM and it includes many templates for different applications.
iMazing Profile Editor. Another free application to create profiles including many templates for different applications.
Thanks for reading, and I’ll leave you with a quote from The Hitchhiker’s Guide to the Galaxy: “Don’t Panic.”
It’s been just over a year now that we have been doing work from home. Things are starting to get better with vaccination and a partial return to offices for some and plans to return for others.
While I know not everyone embraces work from home, I have found it to be enjoyable. There are a couple of items I have bought for my home office that have made remote work much better.
A standing desk
I had a desk with a solid wood top from IKEA and purchased a Monoprice dual motor powered standing desk frame. I put it together in an hour or so and was able to get up and running again very quickly. I find that I like to do certain tasks standing up and having multiple preset heights has worked out very well for me.
A new office chair
I searched and did a lot of research before landing on a chair. I had been using a 10 year old chair from Office Max or Staples with a memory foam pillow to add cushioning. As you might expect, this is not ideal for long term use. After consulting multiple reviews I landed on the Ergo Chair 2 from Autonomous and I don’t think I’d be much happier with anything else. It’s worlds better than the ancient (though probably expensive) chair I have in my office at work and it was a great upgrade for home when I am in my office for hours every day.
If you felt so inclined to purchase from autonomous (they sell standing desks as well!) here’s a referral link to purchase that should offer you a discount as well: https://bit.ly/3d6i8VI.
A laptop stand
I picked up a Rain Design stand to put my laptop up a little higher on my desk, and combining this with a keyboard, mouse and monitor I already had made my laptop setup very easy to use. As a bonus I could use my personal MacBook Pro, my Razer blade stealth or my work MacBook Pro in that same setup easily.
Lots of other accessories can be helpful, like a ring light for all those zoom meetings or a microphone arm to mount on your desk. For me, the standing desk, chair and laptop stand are what really makes me comfortable and ready to work from home. I think having a dedicated space is also very important and I’m working out of a spare bedroom which affords me the separation between work and home.
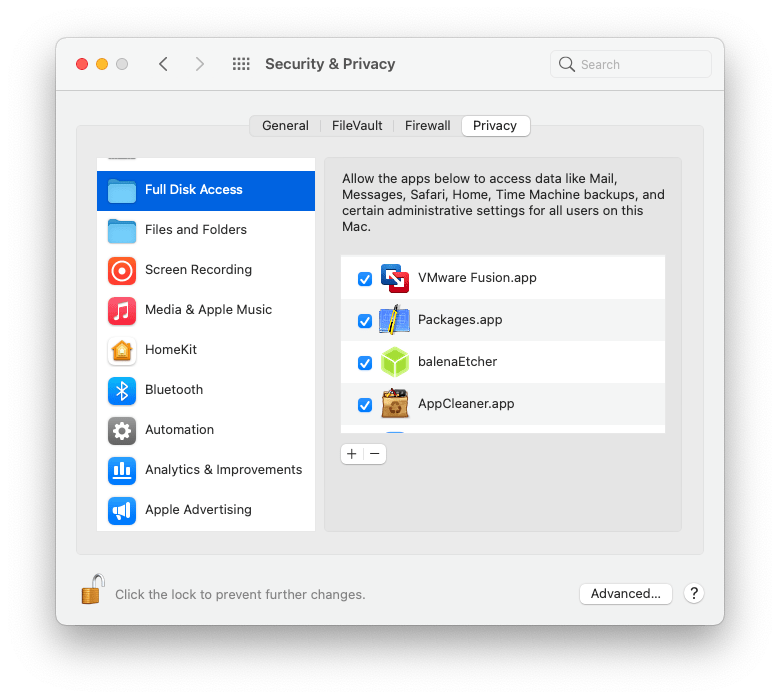
If you get an error that you cannot create a file inside a folder when building in Whitebox Packages, take a look at where the original file is located.
If the file is located within your user folder, you might check and see if you’ve given permission to your ~/Documents or ~/Downloads folder. Or perhaps you’ve given Full Disk Access even.
Somehow, even with these permission set I continue to get this error. I am currently running Big Sur 11.2 and Packages 1.2.9, current as of this writing. I have found that a good workaround is to stage the files I am using in my package in the /Users/Shared folder. The permissions are more open in that folder as its intended for multiple users to access. If I shift the location of the files to be used into that folder I can successfully build.
In multiuser labs on campus we often have people log in once, and never log in again. Sometimes they pick a machine and always use that, sure, but inevitably at some point in the semester we start to run low on disk space. For that reason I have a policy to run once a week on our lab systems that runs a script to check if a user profile has been logged into within a variable number of days. For most systems I’ll use 28 days.
All lab systems are subject to replacement in the event of hardware or software failure, and as such generally a student (or faculty member) should be using network storage or google drive. At the same time we want to provide the convenience to users who may use the same system every class or study period.
This script is based on a script from a coworker (who appears to have pulled it from a GitHub and modified it). Its fairly simple but searches based on the last modified and excludes any user currently logged in. I use a variable (#4) to assign different ages based on the locations.
error=0
## Checks if the variable has been provided
days=$4
if [[ -z $days ]]; then
	read -p "Profile Age:" days
fi
## new shorter bash method to get logged in user
loggedInUser=$( scutil <<< "show State:/Users/ConsoleUser" | awk '/Name ꞉/ && ! /loginwindow/ { print $3 }' )
## Do not delete the current user or the shared folder, add additional users if needed
permanent=("Shared" "$loggedInUser")
## Verify script is being run as root
if [[ $UID -ne 0 ]]; then echo "$0 must be run as root." && exit 1; fi
## users that have not been active in the specified number of days
allusers=`/usr/bin/find /Users -type d -maxdepth 1 -mindepth 1 -not -name "." -mtime +$days`
echo "deleting inactive users"
## iterate through each inactive user, check if they are in the permanent list, then delete
for username in $allusers; do
	if ! [[ ${permanent[*]} =~ "$username" ]]; then
		echo "Deleting inactive (over $days days) account" $username

		# delete user
		/usr/bin/dscl . delete $username > /dev/null 2>&1

		# find and delete home folder (in case it is not in /Users/)
		home=$( dscl . read /Users/${username} NFSHomeDirectory )
		/bin/rm -r $home
		continue
	else
		echo "skip" $username
	fi
done
echo "complete"
exit $error
Edit: I made some changes to the above script, including using a method to get the current logged in user via bash found here http://erikberglund.github.io/2018/Get-the-currently-logged-in-user,-in-Bash/ and some errors pointed out in a comment in my logic where I conflated username and home folder in a variable.
Edit 2: it seems the codeblock above had a strange WordPress induced bug in line 10 where it was displaying a colon backslash as an emoji. I have worked around this to display correctly, but please make sure you copy from the correct script located on GitHub here.
We have found ourselves in need of more loaner laptops than ever before with growing numbers of students and faculty attending class remotely. In an effort to come up with a simple way to prepare these laptops after they are returned and sanitized I went looking for how I can set up with the least interactivity required.
After some research, I found this JamfNation thread. I can launch Jamf’s jamfhelper application and run at the login window, but only if its opened from a launchdaemon. That led me to this script which builds a launchdaemon to run jamfhelper and run through our prep workflow.
Luckily, as I described in this post from my JNUC2020 presentation, I have most of our software set up with policies on custom triggers to run with DEPNotify for our standard and zero touch deployment strategy. I took above script and customized it, and created a new prestage enrollment to skip account creation then run this script on enrollment. Of course I had to assign each serial number to this prestage enrollment so I utilized the MUT‘s Groups and Prestages template to upload the list of serial numbers to the newly created prestage for this refresh process.
With that configuration, we can have a student or help desk associate go through the setup on a lab or prepare a recently returned loaner using an erase install progress in Self Service. This allows us to set things up quickly without needing any passwords shared or requiring someone to go through the user setup process.
While not as pretty as DEPNotify, this does show a useful progression
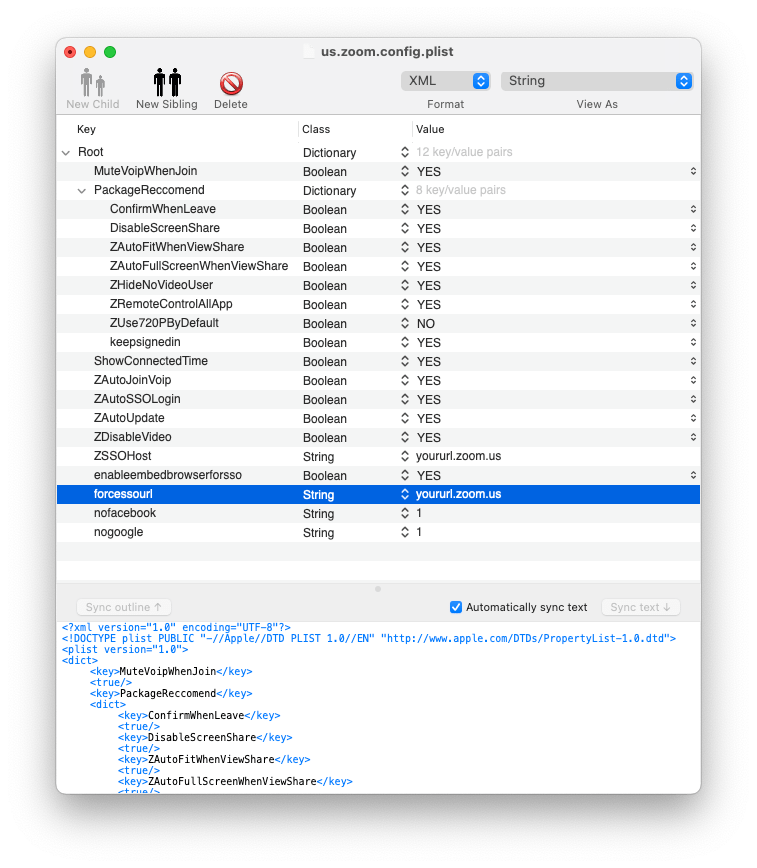
Zoom has made lots of changes recently, both for security and management. In management we’ve seen some nice things including the ability to set preferences as preferred but not enforced. These are now set under a new key of PackageRecommend.
The article from zoom is quite helpful as it gives detail on settings and their use. First you’ll need to download the IT installer for distribution, and you’ll need to create a plist file to distribute. In our case, I made a package to drop it in the required location. Currently, the article specifies /Library/Preferences as the location to put this file.
This is a sample of the settings you can configure with the plist using PlistEdit Pro
I used PlistEdit Pro to edit this, though as they are XML files a number of programs will work just fine.
I received a few questions on how I used outset, dockutil and desktoppr to set some basic user settings on new deployments after my JNUC session. I’ve added 2 new scripts to my GitHub under MacAdminScripts as examples. Outset is a utility that allows scripts to be run at various times, and with differing permissions. You can run scripts as root or the logged in user, choose to run at login or boot, and have a script run every login or just once per user. There is also the ability to run on demand.
defaultdock.sh shows an example of using dockutil to clear the existing dock, and then set a basic one with browser, Microsoft Office and Self Service applications, and including an applications and downloads stack.
# set to the path of dockutil
dockutil="/usr/local/bin/dockutil"

# Delete everything from the dock and replace it with a specific selection of apps.
${dockutil} --remove all --no-restart
sleep 2 # we add a delay so that the dock has time to inialize the removal
${dockutil} --add /Applications/Firefox.app --no-restart
${dockutil} --add /Applications/Google\ Chrome.app --no-restart
${dockutil} --add /Applications/Microsoft\ Word.app --no-restart
${dockutil} --add /Applications/Microsoft\ Excel.app --no-restart
${dockutil} --add /Applications/Microsoft\ PowerPoint.app --no-restart
${dockutil} --add /Applications/Self\ Service.app --no-restart
${dockutil} --add '/Applications' --view list --sort name --no-restart
${dockutil} --add '~/Downloads' --view fan
defaultusersettings.sh has a few basic settings for security, like ensuring the user’s home folder is secured from other users, secure keyboard entry in terminal, and sets some basic user settings requested, like a basic blank desktop background and settings in Finder to show file extensions, folders first in list view, and display drives on the desktop.
# Secure home folder
chmod -R og-rwx ~/

# Secure Keyboard Entry in Terminal
defaults write com.apple.Terminal.plist SecureKeyboardEntry -int 1

# Set Desktop Background
sleep 5 # add sleep to make sure desktoppr works
/usr/local/bin/desktoppr "/Library/Desktop Pictures/Solid Colors/Space Gray.png"

# Set scroll direction for mouse
defaults write com.apple.swipescrolldirection -bool false

# Display filename extensions
defaults write NSGlobalDomain AppleShowAllExtensions -bool true

# Set folders to be sorted first in Finder view
defaults write com.apple.finder.plist _FXSortFoldersFirst -bool true

#show Hard Drives, Network Drives, removable media on desktop
defaults write com.apple.finder ShowHardDrivesOnDesktop -bool true
defaults write com.apple.finder ShowExternalHardDrivesOnDesktop -bool true
defaults write com.apple.finder ShowRemovableMediaOnDesktop -bool true
defaults write com.apple.finder ShowMountedServersOnDesktop -bool true

# Reset Finder
killall Finder
These are packaged and deployed into the outset/login-once folder (located in usr/local/) and with all 3 tools deployed during initial setup, it only takes a few moments to get the user’s account configured with some basic user settings.
Hi folks! If you’ve found your way here for more detailed information from my session at JNUC 2020, From Hands-on to Zero Touch, welcome! I’ve detailed the steps here outlining the process that took us to being able to support zero touch when suddenly everyone was remote.
Initially we were using DeployStudio to image our Macs. The workflow was to erase the machine and push down static image known as a Gold Master. DeployStudio worked with netboot, which is no longer available as an option on new Macs. It was also able to install packages, and truthfully we were installing many items from packages for multiple workflows. Most of you know that this is no longer the preferred method, and hasn’t been for some time due to changes in Apple’s security and macOS. We initially were modifying the Default User Template and found that certain things were no longer working when customized. We started seeing permissions issues crop up, and with certain updates machines weren’t getting firmware updates.
One of the biggest reasons to move was the changes with User Approved Kernel Extension Loading (UAKEL) and User Approved Mobile Device Management (UAMDM). These two settings specifically require approval at each machine unless you enroll with DEP/ADE. We migrated to using Jamf Imaging, which was similar in some ways. We wiped the drive, but used a blank OS image created with AutoDMG and installed all applications and settings individually with packages. This was an important setup step to allow us to more easily move to a Device Enrollment Program, or DEP, (now known as Apple Device Enrollment or ADE) workflow. By having a workflow with packages we were able to migrate and test easily a new automated workflow.
But this spring, suddenly everyone was remote. We still had new employees starting who needed computers. I made sure our package repository was available in the cloud by replicating our on-prem repo to Jamf cloud. I ensured that new users would have NoMAD and VPN installed to make sure they could access network resources and sync their password to their AD credentials even when off campus.
Here’s a short list of the major steps needed to make sure we were ready to deploy zero touch:
Sign up for Apple’s Device Enrollment
Ensure our JSS and package repo is available off campus
Configure Prestage Enrollment
Utilize Inventory Preload
Configure setup with DEPNotify and DEPNotifyStarter.sh
Use NoMAD to sync a local password with the user’s AD password
A backup plan in Self Service in case our DEPNotify workflow doesn’t start because of the enrollmentComplete trigger failing
And here is a list of important tools I used in the process:
DEPNotify: a great utility to make it look nice while installing your standard software
DEPNotify-Starter: A bash script you can customize to run an array of policies and display output to DEPNotify
NoMAD: An alternative to binding to AD, allows a local user account maintain a kerberos ticket and sync your password with an AD account password.
Outset: A utility that allows scripts to be run at various times, login or boot and with options for running once or every time. Useful to set some specific user settings without modifying the user template.
Dockutil: Allows for modification of the dock using a script.
Desktoppr: Allows changing the user’s desktop background without asking for additional permissions as osascript does.
Whitebox Packages: A GUI application to build package installers. Alternately, you can use Jamf’s Composer.
Profile Creator: A GUI application to build granular profiles and optionally sign them.
the MUT: This is a GUI tool for uploading information to Jamf using the API. Allows you to move devices between different Prestage enrollments, update device inventory information and clearing inventory or EA data for specific machines.
Jamf API: scripts written using this to grab inventory data to customize the system
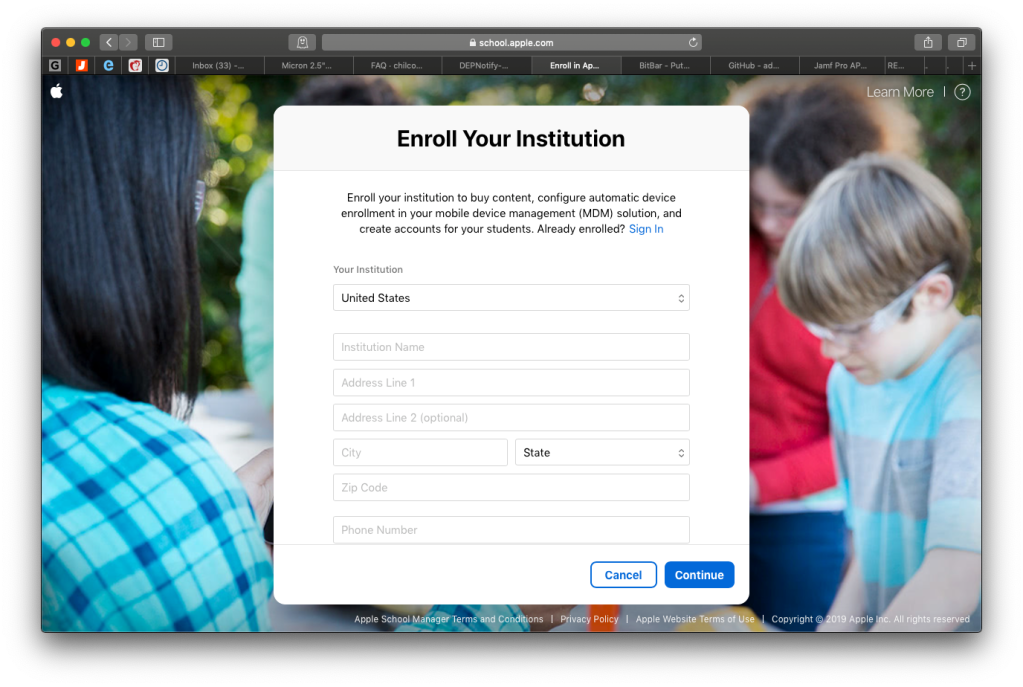
Signing Up for Apple’s Device Enrollment
Setting up an account on Apple School Manager or Apple Business Manager is the first step. I found it to be generally stress free. A simple form to fill out, followed by a call to my boss to verify things. Once enrolled, I was able to link our Apple Customer Number to the account and import all our purchases to assign to our Jamf Pro instance.
A fairly simple form to fill out
Apple Business Manager and Apple School Manager recently changed their interface, but I initially was able to upload and assign machines using a csv exported from my inventory system.
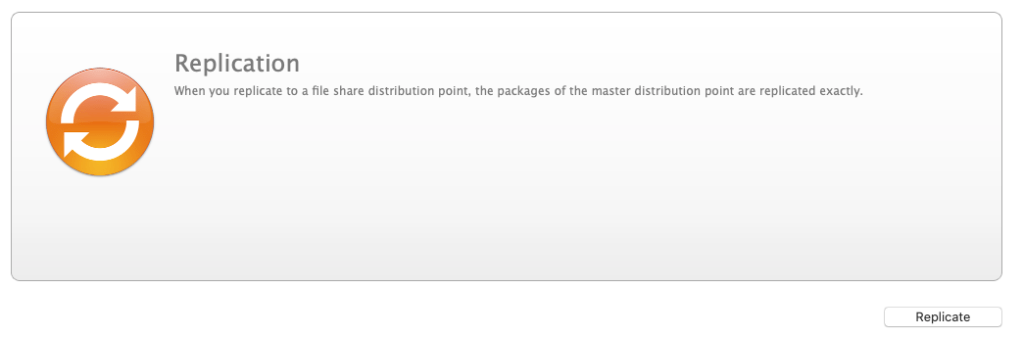
Ensuring Jamf is Available Everywhere
We had migrated to Jamf Cloud some time ago already, but were still using a local package repository. I was able to take that repository and replicate it to our cloud storage and set that cloud storage as our main repository. While time consuming, it worked eventually. I just had to ensure my machine did not fall asleep during that initial replication, for this I used the caffeinate command.
Just one button to click in Jamf Admin
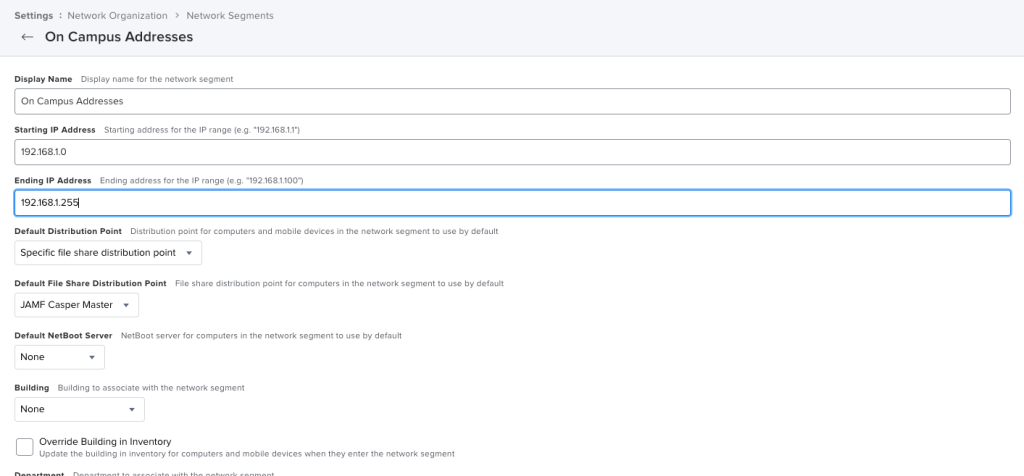
I followed this with keeping our on campus distribution, and and I created a Network Segment to direct traffic to the local package repository. I also found that you cannot immediately replicate a package you’ve uploaded, and you must wait for a short while before a cloud package can be replicated.
Network segment for on campus addresses directed to the on campus server.
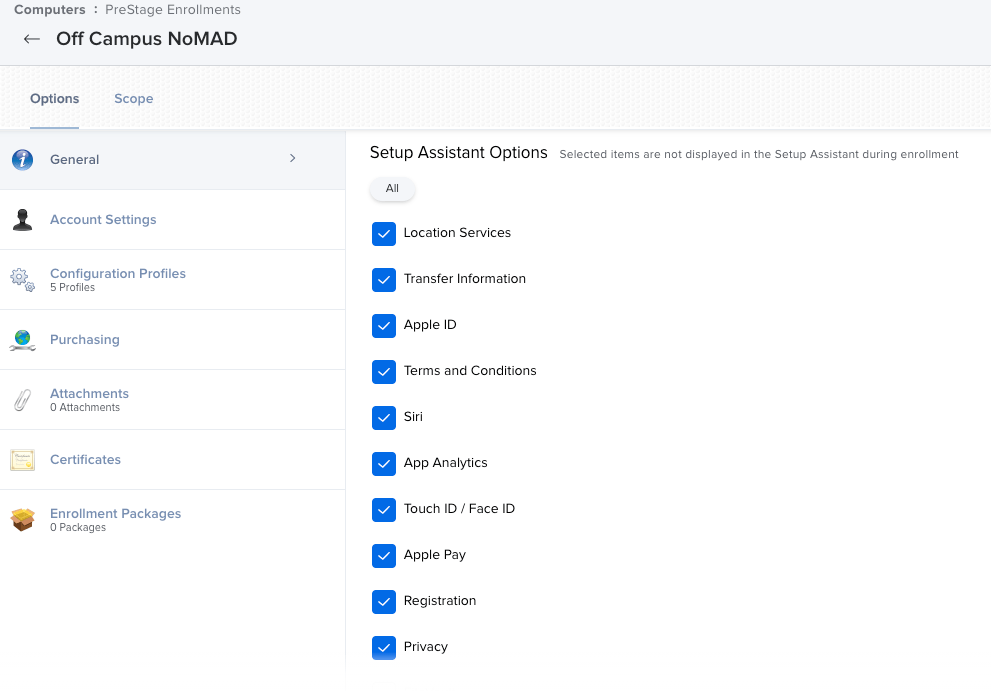
Configure Prestage Enrollment
There are a few things to keep in mind here, if you apply a profile at this point you’ll need the machine to still be in scope. If you deploy a package with prestage enrollment you initially needed a cloud repository as your main, and it needs to be signed. This has since been amended to allow on-prem to host a prestage package, but this could be problematic if a machine is powered on and connected off campus.
There are customizations you can make to the setup assistant like skipping options, or adding profiles and packages.
Skipping options to speed up setup.
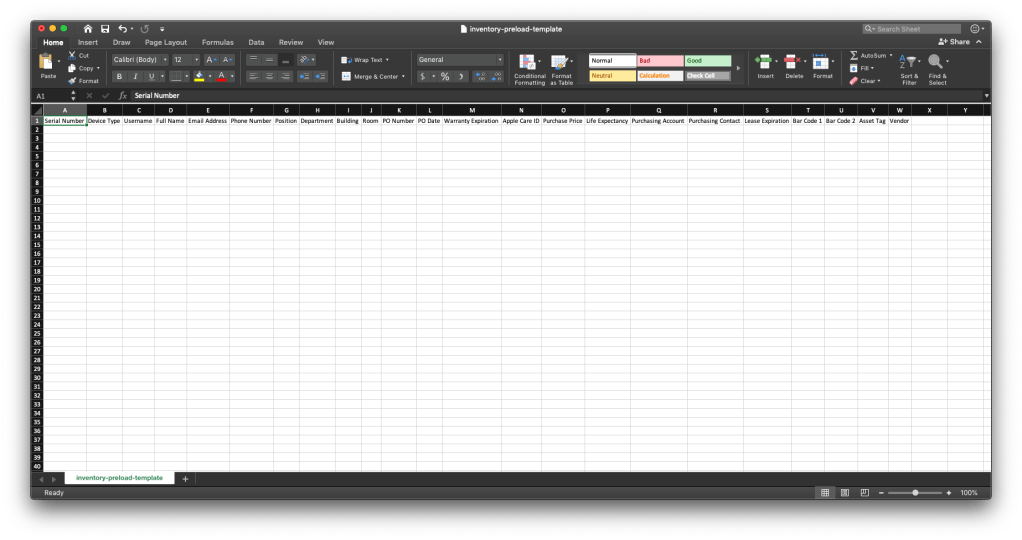
Utilize Inventory Preload
First you’ll need to make sure you have Buildings and Departments populated. This can be done manually, or with an API script to upload. I use these to scope specialized software and printers based on location or department (as some departments may be in more than one building on campus). You will get an error if you try to use a building or department that does not yet exist.
There are many fields available for Inventory Preload
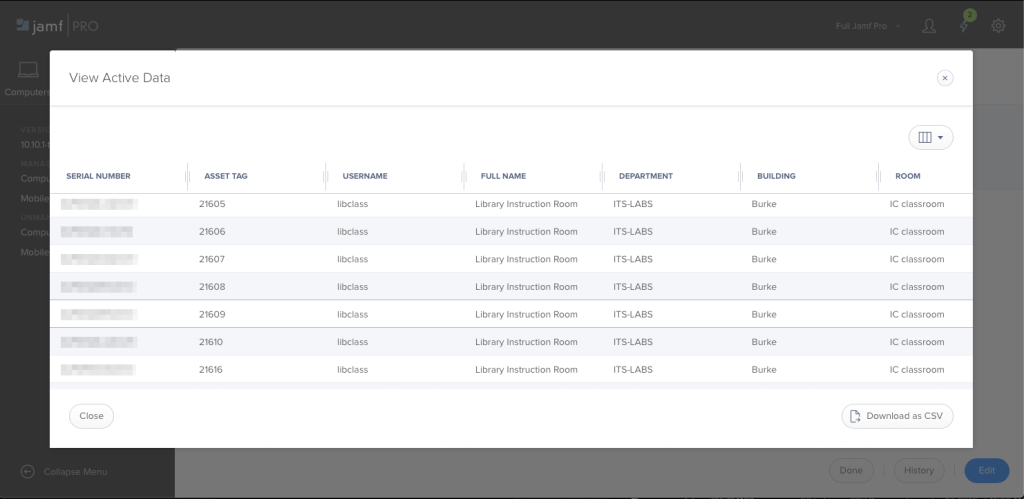
Once the file is prepared you can upload it, in the settings area. After uploading you can view your data.
Your view will include the fields you choose, but this is a good way to verify your data.
Configure setup with DEPNotify and DEPNotify-Starter
I configured DEPNotify with a series of policies to install software scoped to all machines, or some to just specific departments or buildings.
Most importantly here is making sure you have policies for all the software and user customization you will apply. I deploy outset, dockutil and desktoppr and scripts utilizing them with the outset logon-once folder so they run once to create a basic setup for each user. Edit: here is a post with some sample scripts to set user settings with outset, dockutil and desktoppr.
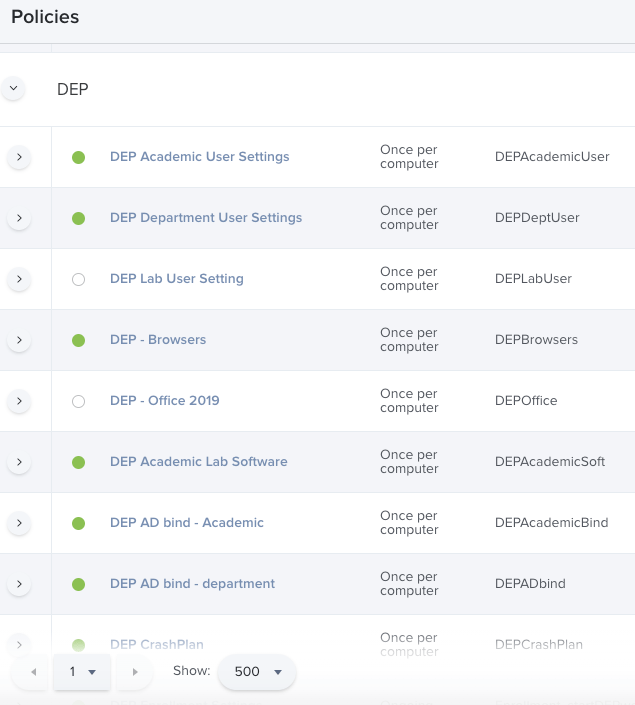
Policies sorted with a name for DEP and a trigger with DEP to make it easier to see
The main customization with DEPNotify-Starter was to create my own array of policies and display text. I have one version of this script and each policy is scoped based on things like the department and building that we set in inventory preload.
Array of policies with custom triggers, and display text for DEPNotify
I also deploy software for things like security, our basic applications like web browsers and Microsoft office. I have multiple policies so they can be scoped as needed to departments, academic facilities, or specific labs. I utilize the Jamf API with scripts to customize, as detailed here. These API scripts are one of the reasons I use inventory preload, I can assign a machine to a user based on the serial number and use it to set up with the appropriate building and department.
Use NoMAD to sync a local password with the user’s AD password
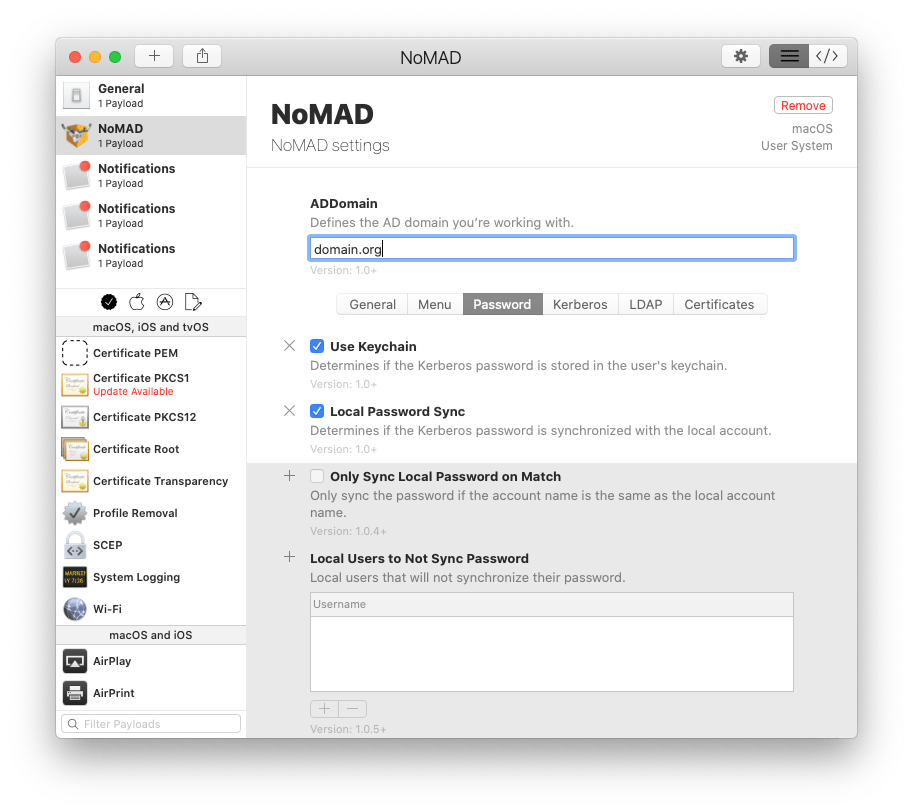
Fairly straightforward here, we push NoMAD, the launch daemon and a profile to configure the software. Once the user’s account is configured, if they are on campus they can log in and sync their password. If they are off campus, they can do the same once they log in via VPN.
Profile Creator has presets for NoMAD to create profiles you can upload to Jamf.
A backup plan in Self Service
A custom trigger on the DEPNotify-Starter policy allows me to set it in Self Service to kick off in case the enrollmentComplete trigger doesn’t work for some reason.
Using the jamfEvent script I detailed here.Configured to display in Self Service
Hopefully this clears up some of the steps required to pivot to a modern deployment workflow that is compatible with zero touch.
Using some of the scripts I’ve mentioned I created a policy to enable FileVault encryption with a button in Self Service. In macOS 10.15 Catalina a new feature called the Bootstrap Token was introduced, which gives a newly created AD mobile account Secure Token access delivered from the MDM. This gives permissions to enable FileVault without a user who initially set up the computer standing over someone’s shoulder to input a password.
The policy is set up in a few parts. There is a one policy to enable encryption, a static group to which that policy is scoped, a profile to lock the FileVault pane in System Preferences, and a Self Service policy to kick it off.
This method does require a user to log out and then log back in for it to enable encryption, but with new T2 based systems the encryption is instant. Newer pre-T2 systems on SSD are pretty quick as well.